$109.77
Add to Cart
CD6 drive mechanism for select 2001+ Acura radios. OEM factory original CD mech


ReplacementRadios, one of the largest factory audio/video websites, has branched out!! If you’ve been to our site, you know we have a HUGE selection of OEM radios and compatible accessories. Now we’re offering a few select products here too. Same great ReplacementRadios quality.....in a new location.
SUMMARY
NEW Factory (OEM) CD6 drive
New Old Stock assembly line leftover
Quantities are extremely limited!!
-So we do not offer quantity discounts
Manufactured by Panasonic for Delco
Installation instructions are NOT included
-But basic ones appear below
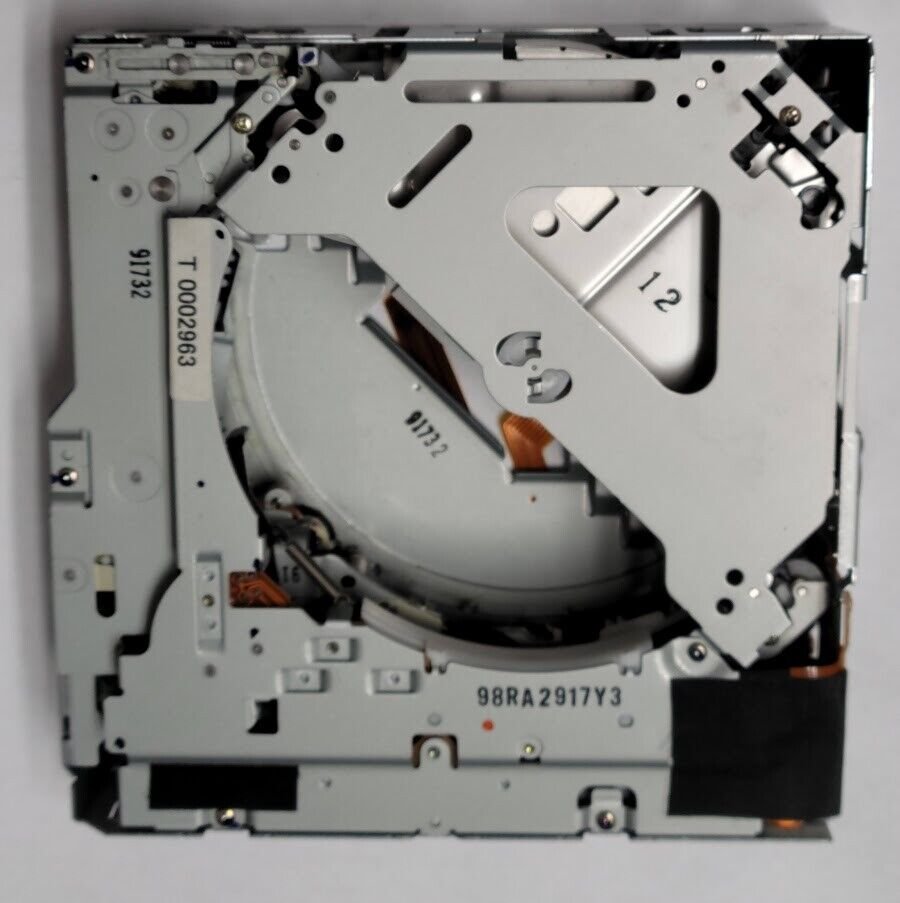
Looks like the drive pictured
-Has a single 'triangle' opening above the CD trays
--Yours must have this opening as well
--NOT compatible if yours is double 'kidney'
A GREAT way to replace a drive with problems like:
-CD playback issues or errors
-CD load issues or errors
-CD eject issues or errors
Compatible with the AM/FM/CD6 radio
-Not the remote 6 CD changer
--Remote means separate from the radio
Compatible with BOSE or non-BOSE CD6 radios
Not compatible with navigation radios
Not compatible with single CD or CD/Cass radios
Not compatible with MP3 radios
Plays standard audio format CDs and CDRs
Has NEVER been in a vehicle!!
Will require removal of radio from vehicle
-Do not attempt with radio connected
Plug and play
-No soldering or splicing required
--Just a few screws and one or two cables
---You will transfer your top circuit board too
Board number is E-8586C-1 or -2, E-9058-1 or -2, or equivalent
-Maybe a few others
Follow instructions below to see if yours is compatible
-Found in the DETAILS section
Your drive must have single 'triangle' opening
-Not double 'kidneys'
Some drives require a secondary board swap
-No soldering required
-See info in DETAILS below
Has the 15-pin connector
-Doesn't make it right for all 15-pin applications
-See DETAILS section for info
Does not include cables, brackets, or the top circuit board
-You will re-use yours
Not compatible with all 2003 models
-Follow instructions below to see if yours is
--Found in the DETAILS section
90 day warranty
DETAILS
This is a new 6 disc CD drive for select radios found in select 2001-2003 Acura cars and SUVs. Even though it looks like the drive used in other applications (GM, Ford, Nissan, Toyota, Audi, Hyundai, Honda, etc), this is the Acura version and it's not usually interchangeable. There is a 90 day replacement warranty on this item. It covers functional defects only.
Instructions for matching to your drive: You will need to pop the top case off your radio to verify yours has this drive because some radios were offered with a different, incompatible drive. Especially in the 2003 model year. If yours doesn't look virtually identical to the one pictured, it won't work for you. The most important thing to look for is the opening above the CD trays. If there are two 'kidney' shaped openings, this is not the right one for you. Yours must have one triangle shaped opening.
Please note: the green circuit board on top of your drive will need transferred to this one. (No soldering required. It's a couple screws, a couple bendable tabs, and a cable. Easy peasy.) Sometimes your green board is bad and requires replacement. It is rare, but it happens. Our drive is tested right before it ships, so we know it worked. Sometimes the package gets jolted hard, in just the wrong manner, and something gets bounced out of place in the drive but, the majority of the time, if you are still having the same problem as before the replacement, you need to replace your top circuit board too. (Which we no longer have.) If you have difficulties after install, please email us before jumping to conclusions that we sent the wrong thing, a used drive, etc. You can see from our feedback, that's not how we operate.
APPLICATIONS
Some 2001-2003 Acura vehicles. The most important thing is that your drive has the single 'triangle' opening above the CD trays. A few vehicles on the list were offered with radios that had a different drive. Especially in 2003. Pop the top off your case. If your drive matches the requirements listed in the Instructions for matching to your drive section above, you can use this.
In very rare instances, you may find replacing the drive does not solve your problem. Replacement of your radio might be your only option or replacement of your top circuit board may be required. Please be aware we have no control over this. Nor do we have any way of predicting when this is going to happen.
Removal/Installation Instructions Instructions are not included but installation is relatively easy and basic guidelines appear here. However, if you're not mechanically inclined, you shouldn't be buying it... You start by disconnecting the radio from the vehicle harness and letting it sit for at least 30 minutes. You remove the face by first removing any screws which hold it in place. (Often there is one on each side of the radio, just behind the face.) Once all screws are removed, work your way around the face, gently prying it off at the tab locations. Then you remove two screws holding the drive in from the front and two more from the rear. The drive can usually be lifted up (carefully) at that point. (Although, in some applications, additional pieces of the radio case will need removed.) Once the drive can be lifted free, you will need to do so carefully and you will detach the ribbon cable from the bottom when you have it raised enough to gain access to it. If there is a bracket attached to the back of your drive, it will need swapped to the new one. The top and/or side circuit board from your drive will need transferred to this drive as well. Make sure you put the screws back in the same holes as before and do not over-tighten them. They can be sized differently, even if it isn't obvious by looking. Sometimes customers have problems with the drive continually cycling after install and saying INITIALIZING on the display or sometimes it loads but will not play. This is usually a result of the wrong screw being placed in the hole directly behind the volume/power knob OR it being over-tightened. If you have this problem and you think you've put the screws in the right hole, remove that screw altogether and see if it works then. If it does, the screw is either in the wrong hole or has been over-tightened. You can file the end of the screw down to make it shorter and re-insert it. (Or you can just leave it out. We do not recommend leaving it out but several customers have done so and have not reported any repercussions.) Do not attempt this repair with the radio still plugged in! Unplug it and let it sit for at least 30 minutes.
ABOUT US:
We are NOT a salvage yard. We are NOT affiliated with a salvage yard. We don't have the typical auto parts mentality. We specialize in one thing: factory audio/video. We are very picky and strive to provide items we would be proud to have in our own vehicles. When you buy an item from us, it is guaranteed to work. Occasionally problems arise with electronics. However, please be assured we never knowingly send out a defective item. It is not in our best interest to send out defective items because we waste time and money replacing them under our warranty. We aim to keep our returns low and our customer satisfaction high. Please give us a chance to add you to our long list of satisfied customers.
SHIPPING and HANDLING
-Shipping cost is based on weight and zip code. This site does the figuring, not us. If you feel their calculation is high, you might be underestimating the package weight, size, and/or current shipping costs from our zip code (62401) to yours. Please don't ding us for shipping in the ratings, as we have no control over ever-increasing carrier rates.
-We will enter a tracking number into your order details here on the site. They will email it to you if your notification preferences are set correctly.
-A signature is not typically required. If you are not home to receive the package, it will most likely be left at your door. Please monitor it's progress and arrange to collect it when it arrives.
-This site provides a section/tab in each ad for Shipping information. We encourage you to check that section for prices, methods, time-frames, etc.
SUMMARY
NEW Factory (OEM) CD6 drive
New Old Stock assembly line leftover
Quantities are extremely limited!!
-So we do not offer quantity discounts
Manufactured by Panasonic for Delco
Installation instructions are NOT included
-But basic ones appear below
Looks like the drive pictured
-Has a single 'triangle' opening above the CD trays
--Yours must have this opening as well
--NOT compatible if yours is double 'kidney'
A GREAT way to replace a drive with problems like:
-CD playback issues or errors
-CD load issues or errors
-CD eject issues or errors
Compatible with the AM/FM/CD6 radio
-Not the remote 6 CD changer
--Remote means separate from the radio
Compatible with BOSE or non-BOSE CD6 radios
Not compatible with navigation radios
Not compatible with single CD or CD/Cass radios
Not compatible with MP3 radios
Plays standard audio format CDs and CDRs
Has NEVER been in a vehicle!!
Will require removal of radio from vehicle
-Do not attempt with radio connected
Plug and play
-No soldering or splicing required
--Just a few screws and one or two cables
---You will transfer your top circuit board too
Board number is E-8586C-1 or -2, E-9058-1 or -2, or equivalent
-Maybe a few others
Follow instructions below to see if yours is compatible
-Found in the DETAILS section
Your drive must have single 'triangle' opening
-Not double 'kidneys'
Some drives require a secondary board swap
-No soldering required
-See info in DETAILS below
Has the 15-pin connector
-Doesn't make it right for all 15-pin applications
-See DETAILS section for info
Does not include cables, brackets, or the top circuit board
-You will re-use yours
Not compatible with all 2003 models
-Follow instructions below to see if yours is
--Found in the DETAILS section
90 day warranty
DETAILS
This is a new 6 disc CD drive for select radios found in select 2001-2003 Acura cars and SUVs. Even though it looks like the drive used in other applications (GM, Ford, Nissan, Toyota, Audi, Hyundai, Honda, etc), this is the Acura version and it's not usually interchangeable. There is a 90 day replacement warranty on this item. It covers functional defects only.
Instructions for matching to your drive: You will need to pop the top case off your radio to verify yours has this drive because some radios were offered with a different, incompatible drive. Especially in the 2003 model year. If yours doesn't look virtually identical to the one pictured, it won't work for you. The most important thing to look for is the opening above the CD trays. If there are two 'kidney' shaped openings, this is not the right one for you. Yours must have one triangle shaped opening.
Please note: the green circuit board on top of your drive will need transferred to this one. (No soldering required. It's a couple screws, a couple bendable tabs, and a cable. Easy peasy.) Sometimes your green board is bad and requires replacement. It is rare, but it happens. Our drive is tested right before it ships, so we know it worked. Sometimes the package gets jolted hard, in just the wrong manner, and something gets bounced out of place in the drive but, the majority of the time, if you are still having the same problem as before the replacement, you need to replace your top circuit board too. (Which we no longer have.) If you have difficulties after install, please email us before jumping to conclusions that we sent the wrong thing, a used drive, etc. You can see from our feedback, that's not how we operate.
APPLICATIONS
Some 2001-2003 Acura vehicles. The most important thing is that your drive has the single 'triangle' opening above the CD trays. A few vehicles on the list were offered with radios that had a different drive. Especially in 2003. Pop the top off your case. If your drive matches the requirements listed in the Instructions for matching to your drive section above, you can use this.
In very rare instances, you may find replacing the drive does not solve your problem. Replacement of your radio might be your only option or replacement of your top circuit board may be required. Please be aware we have no control over this. Nor do we have any way of predicting when this is going to happen.
Removal/Installation Instructions Instructions are not included but installation is relatively easy and basic guidelines appear here. However, if you're not mechanically inclined, you shouldn't be buying it... You start by disconnecting the radio from the vehicle harness and letting it sit for at least 30 minutes. You remove the face by first removing any screws which hold it in place. (Often there is one on each side of the radio, just behind the face.) Once all screws are removed, work your way around the face, gently prying it off at the tab locations. Then you remove two screws holding the drive in from the front and two more from the rear. The drive can usually be lifted up (carefully) at that point. (Although, in some applications, additional pieces of the radio case will need removed.) Once the drive can be lifted free, you will need to do so carefully and you will detach the ribbon cable from the bottom when you have it raised enough to gain access to it. If there is a bracket attached to the back of your drive, it will need swapped to the new one. The top and/or side circuit board from your drive will need transferred to this drive as well. Make sure you put the screws back in the same holes as before and do not over-tighten them. They can be sized differently, even if it isn't obvious by looking. Sometimes customers have problems with the drive continually cycling after install and saying INITIALIZING on the display or sometimes it loads but will not play. This is usually a result of the wrong screw being placed in the hole directly behind the volume/power knob OR it being over-tightened. If you have this problem and you think you've put the screws in the right hole, remove that screw altogether and see if it works then. If it does, the screw is either in the wrong hole or has been over-tightened. You can file the end of the screw down to make it shorter and re-insert it. (Or you can just leave it out. We do not recommend leaving it out but several customers have done so and have not reported any repercussions.) Do not attempt this repair with the radio still plugged in! Unplug it and let it sit for at least 30 minutes.
ABOUT US:
We are NOT a salvage yard. We are NOT affiliated with a salvage yard. We don't have the typical auto parts mentality. We specialize in one thing: factory audio/video. We are very picky and strive to provide items we would be proud to have in our own vehicles. When you buy an item from us, it is guaranteed to work. Occasionally problems arise with electronics. However, please be assured we never knowingly send out a defective item. It is not in our best interest to send out defective items because we waste time and money replacing them under our warranty. We aim to keep our returns low and our customer satisfaction high. Please give us a chance to add you to our long list of satisfied customers.
SHIPPING and HANDLING
-Shipping cost is based on weight and zip code. This site does the figuring, not us. If you feel their calculation is high, you might be underestimating the package weight, size, and/or current shipping costs from our zip code (62401) to yours. Please don't ding us for shipping in the ratings, as we have no control over ever-increasing carrier rates.
-We will enter a tracking number into your order details here on the site. They will email it to you if your notification preferences are set correctly.
-A signature is not typically required. If you are not home to receive the package, it will most likely be left at your door. Please monitor it's progress and arrange to collect it when it arrives.
-This site provides a section/tab in each ad for Shipping information. We encourage you to check that section for prices, methods, time-frames, etc.


